|
|
How to Lock in a Child Restraint
All belts must lock in a
crash. Some belts can be locked before a crash, others lock when the crash
occurs. On any belt, either the latchplate locks the belt, or the belt
is locked by a retractor. All child safety seats must be "locked" into
a seat belt in order to function correctly. In some vehicles, the latchplate
locks, in other vehicles the retractor locks. In all other vehicles, a
locking clip or a heavy-duty belt shortening clip must be used.
Locking clip on a belt
A child restraint should NEVER be installed using the following belt types:
- Automatic Lap/shoulder belt: This type of belt is found in the front passenger seat.
Lap and shoulder belts are both on retractors inside the door. Occupant slides under belts when
getting in and both belts close over the occupant when the door is closed.
- Automatic shoulder belt: This type of belt is found in the front passenger seat, usually with
a lap belt that must be manually fastened.
If you have either of these belt types, be sure to check your owner's manual for instructions regarding
child restraint installation.
What kind of latchplate?
The latchplate is on the male end of the buckle, it holds (or is part of) the buckle tongue. There are
several kinds of latchplates: Locking, light-weight locking, free-sliding,
sewn on and switchable.
- Locking: A latch plate
that holds the lap belt snug after it has been adjusted; contains a metal bar
on the underside of the hardware that “locks” the belt in position. Found on
lap and lap/shoulder belts.
- Light-weight locking: “Lighter weight” version of a locking latchplate. Only on lap/shoulder belts.
- Free-sliding: Type of latch plate that has no lock feature to securely position the latchplate along
the belt webbing. The latchplate “freely” slides along the belt. Only on
lap/shoulder belts.
- Sewn-on: Latch plate is permanently sewn to the lap or lap and shoulder belt.
- Switchable: Only found
in a few vehicles on lap/shoulder belts, this latchplate has a button that can
be moved from “child restraint” mode to “occupant” mode. The “child
restraint” mode locks the latchplate in place to keep the lap portion of the
belt tight.
What kind of retractor?
On some lap belts and lap/shoulder belts, a retractor feeds the belt in and out of a pocket. The
retractor is what locks these belts. There are three types of
retractors:
- ELR – Emergency Locking Retractor: Allows the belt to be freely extended or
rewound. It locks only when the vehicle slows, changes direction or stops
suddenly.
- ALR – Automatic Locking Retractor: Allows belt to be pulled in one motion
until fastened, then operates as a ratchet, winding in slack, preventing
further extension (until completely rewound). In most belts, you will hear a
faint clicking sound that indicates the belt is locked and ratcheting in.
- Switchable– Manually adjustable from ELR mode to ALR mode. For mfost, pull belt webbing
all the way out of the retractor to activate the ALR mode. A slight "click"
may be heard, but the belt will ratchet in to retractor once switched into ALR
mode). In some models, the retractors switch from ELR to ALR by pushing a
button.
The "pull" test can be used to determine the type of retractor you have.
- Slowly pull the belt out about halfway and stop
- Let the belt
retract back several inches.
- Try to pull the belt out more. If the belt cannot be pulled any further, it
is ALR. If it can, go to step three.
- Slowly pull the belt all the way out, and then allow it to retract several inches.
- Try to pull the belt all the way out again. If it cannot be pulled out
after step 4, it is switchable. If it can still be pulled out freely, it is
ELR.
Please
remember that your child is always safest when the child restraint is secured
by following the directions in your vehicle's owners manual and your child
restraint owner’s manual. These instructions are intended to supplement,
not replace those found in your owner’s manual. They are also intended to act
as a guide for those who use taxis or travel in other vehicles in which the
owner’s manual is unavailable.
How to lock in your child restraint:
Using the above information,
you should be able to determine your belt type, your latchplate type and your
retractor type. Now use the following list to determine how to lock in your
child restraint.
|
Lap Belts |
Lap/shoulder Belts |
| Locking Latchplate |
1 |
Locking Latchplate with ALR/ELR/Switchable retractor |
1 |
| Sewn-on latchplate with ELR retractor |
4 |
Light-weight locking latchplate with ALR or Switchable retractor |
6 |
| Sewn-on latchplate with ALR or Switchable retractor |
2 |
Light-weight locking latchplate with ELR retractor |
7 |
|
|
Sewn-on latchplate with ELR retractor |
5 |
|
|
Sewn-on latchplate with ALR or Switchable retractor |
2 |
|
|
Free-sliding latchplate with ELR retractor |
3 |
|
|
Free-sliding latchplate with ALR or Switchable retractor |
2 |
|
|
Switchable latchplate with ELR/ALR/Switchable retractor |
8 |
- Lock the latchplate: Buckle
the seat in; apply weight to seat while pulling on tail or shoulder portion to
tighten the belt. If the belt loosens after tightening, flip the latchplate
over once (backwards) to keep it from slipping. It may also work to twist the
webbing on the female part of the buckle to shorten it so the latchplate is
further away and lower from the child restraint belt path. Either "fix" is
designed to put the latchplate at the correct angle to lock it. NEVER USE
A LOCKING CLIP ON A LAP ONLY BELT
- Lock the retractor: Buckle
the seat in. If the retractor is ALR, then apply weight to the seat while
force-feeding belt into retractor. If the retractor is Switchable, pull the
belt all the way out to lock, then force-feed into the retractor. If the seat
is still loose, carefully unbuckle the belt, allow a small portion more to
feed into the retractor, and then re-buckle the seat.
- Use a locking clip: Buckle
the seat in and apply weight to the seat while pulling on the shoulder belt to
tighten the lap portion. Once the lap belt is tight, grasp both belts above
the latchplate and hold tightly. Unbuckle the seat (still holding belts),
apply a locking clip no more than one inch from latchplate, and apply weight
to the seat again to re-buckle the belt.
- Use a heavy duty locking clip: See below.
- Ignore the shoulder portion. If the lap portion has an ELR retractor, go to 4. If the lap
portion has an ALR or switchable retractor, go to 2.
- Follow the instructions
above to lock the latchplate (1). If the belt still slips, you can also lock
the retractor (2) to keep the child restraint locked in.
- Follow the instructions
above the lock the latchplate (1). If the belt still slips, you may need to
use a locking clip (3) to keep the child restraint locked in.
- Switch the latchplate: Buckle the seat in; apply weight to the seat while pulling on the shoulder portion
to tighten the belt. Switch the button on the latchplate from "occupant" to "child seat" mode.
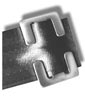
Belt-Shortening Clip or Heavy Duty Locking Clip
A belt-shortening or heavy
duty locking clip is NOT a regular locking clip. A belt-shortening clip is
used to lock a lap belt that cannot be locked by a retractor or a latchplate.
While a belt-shortening clip CAN be substituted for a regular locking clip,
a regular locking clip can NEVER be used to shorten a belt. To do so will
put your child and other passengers in the vehicle in great danger.
The belt-shortening clip is used to shorten the belt to the amount needed to tightly install a child
safety seat. A belt-shortening clip must be ordered from the manufacturer.
GM, Toyota, Nissan and Ford all have them...check with other dealers. NEVER
assume that a clip is a belt-shortening clip - it must be marked as such
or known by you to be heavy duty. The clip that comes with your car seat
is not and should NEVER be used as a belt shortening clip! Always read and
follow the instructions that come with the belt-shortening clip.
To use a belt-shortening clip
First, push the vehicle seat all the way back on it's track if possible.
Apply weight to the child safety seat, buckle the belt and pull the webbing all the way out of the retractor
Make a loop of ALL the excess belt, and either hold it tightly or mark the loop to know where the belt-shortening clip should go.
- Unbuckle the belt and thread the loop up through the bottom of one side of the
clip, then down over the other side.
- Double-back the loop over the second set of "arms" on the clip.
- Place the inside webbing of the loop back in the first side of
the clip.
- Pull the inside (underneath) webbing tight.
|
|
Place the clip anywhere on the belt so that it lies flat, is not close to the
child's face or body, and is convenient for the belt path and easy for the installer to install.
Rebuckle the belt and test the child safety seat to be sure it's tight. If not, repeat steps 2-6.
For the tightest fit, move the vehicle seat forward on it's track.
|